
Editor’s Note: This exhibit was published on the previous iteration of NINES.org. The only authorship attribution was to user ccg84. If this is your exhibit, please contact us so that we may provide proper attribution.
Many of the images embedded in the original exhibit are no longer available at their original addresses. The images and their original citations have been retained.
Lively Arts History Association
The following exhibit will begin by discussing the sexual attitudes of Victorian England, and then discuss the various sex manuals which existed to prevent the above scenarios from occurring. The unfortunate uneducated mentioned above were largely middle-class people, so the exhibit will focus on the education of middle-class Victorians throughout the period, mainly exploring how women were prepared for their wedding night.
Impressions vs. Reality of Victorian Sexuality
In the modern lexicon, “Victorian” is used as an adjective to describe frigid or prudish attitudes. Everyone has heard the tales of Victorian sexual repression, like covered table and piano legs, lest the curvy shape of the furniture remind viewers of a woman’s body. Perhaps the most cited example of Victorian prudishness is the legend of Queen Victorian telling her daughter to “lie back and think of England” on her wedding night. This second example perhaps points not at the prudishness of the time, but a larger problem—discussion of sex was so taboo, that many went uneducated about the topic of sex (down to the simple physical mechanics of the act) until their first experience (sometimes, but not always, on their wedding night). Victorians were absolutely having sex out of wedlock, especially in the upper and lower classes. The bourgeoisie were especially open about this fact, documenting their sexual escapades in letters and diaries, said Helena Michie in her book Victorian Honeymoons (110). According to Jennifer Phegley in her book Courtship and Marriage in Victorian England, working-class people were having sex before marriage, as well, to the point that a premarital pregnancy was seen in some circles as a way to secure a husband (59). The middle-class population seem to be the section of Victorian England most responsible for the prudish impression held by modern users of the adjective “Victorian.”
In Victorian England, a woman was expected to be a virgin on her wedding day. Sex was thought of as a way for married couples to spiritually bond and procreate — sex without the possibility of procreation was considered sinful, and the topic of contraception was extremely taboo (Melody 21). While the bride was expected to be pure on her wedding night, it was understood that her new husband, especially if he was rich or working-class, would probably have sexual experience by the way of prostitution (Michie 25). By the late 1700s, over 10,000 prostitutes worked the London streets (Porter 22), spreading disease and sexual knowledge. Even if each woman serviced only one man every day, the numbers are still pretty impressive. While all of these men were learning about sex through the unrealistic and performative veil of prostitution, their middle-class brides-to-be were largely blissfully unaware of the sexual nature of marriage or the mechanics of their reproductive health. Women were marrying in their early twenties (Phegley 36), meaning that full-grown women didn’t understand where babies came from. My research explores how these women learn what was up with their bodies: where did Victorian middle-class women learn about their “wifely duties” and the reproductive structures of their own anatomies? In short, my findings showed that women learned mostly through experience in the marriage bed.

Franz Xaver Winterhalter via Wikimedia Commons
Where did women learn?
Some scholars have posited that women learned about sexuality through a network of female family and friends, but, according to Michie, little written evidence exists to back this claim up (120). Some women read sex manuals, which, at the time, were not the encyclopedia of useful and well-explained information that, for example, the modern Our Bodies, Ourselves is. The advice and information in these manuals, which will be dissected and explained throughout this exhibit, was euphemistic and vague, offering little help to a reader with no starting knowledge. How, for example, should a woman interpret a friend’s written advice about a wedding-night diaper (presumably to protect the bed linens from blood) if the reader is not aware of how her marriage will be physically consummated (125)? Even dictionaries, which would have been more easily accessed by protected daughters, offered little help: words like semen, ovary and menstruation were left out of some volumes entirely (Michie 126). In later Victorian years, sex manuals with scientific information were often kept in the home, but were more intended for the education of male children. Research has not shown whether female children were allowed access to this educational material, which was often kept under lock and key (128). All of this guarding of information means that women may have learned everything they knew about sex on their honeymoon.
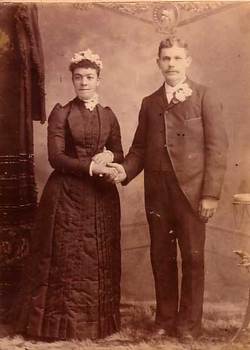
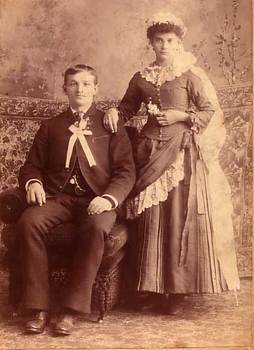
"I think we're alone now": The Victorian honeymoon
Lively Arts History Association
Victorian honeymoons were very different than the tropical vacations that may come to mind today. Following a long engagement (but not too long, as that may encourage extramarital sex), newlyweds would honeymoon for periods of time from two weeks to three months in what was very often the first time the couple had ever spent alone together (Michie 32, 37). Privacy was never afforded to a courting couple. Michie’s above-mentioned book was researched by reading the honeymoon diaries and correspondence of 60 newly married couples (39). In this entire body of research, only a handful of allusions to sexual activity exist (43). This fact is probably due to several reasons: first, the woman writing about her honeymoon would not have felt comfortable divulging intimate details to even her diary. Sex was not a “proper” subject, and she would have been conditioned to regard it as taboo. Also, the honeymoon was about more than the introduction of their sexual life as a married couple: this trip transformed them from virtual strangers who had never spent time alone together to husband and wife. Novelist Charles Kingsley and his wife waited an entire month after their wedding to consummate, allowing the time to become comfortable with one another. This method seems to have been successful, as Phegley cites evidence in their letters of a hot sex life afterward (140).
Probably less commonly, some marriages would not have been consummated due to ill-informed spouses. English poet John Addington Symonds remembers his honeymoon and how it was affected by sex education: “[Society does] all that lies in us to keep them chaste, to develop and refine their sense of shame, while we leave them to imagine what they like about nuptial connection. Then we fling them naked in bed together, modest, alike ignorant, mutually embarrassed by the awkward situation, trusting that they will blunder to truth by instinct” (qtd. in Michie 79). He goes on to say that this ill-informed wedding night only hurts the relationship by causing the couple to start their marriage with shame and confusion instead of joy. This initial shame would surely hurt the end-goal of bonding the couple spiritually through sex. Regardless, misinformation and confusion are both words easily associated with sexual knowledge in this period, no matter the marital status.
"You can't get pregnant if you're not married" and other sexual misinformation
Sexual knowledge in the hands of unmarried people was seen as dangerous—those children (or, in the case of an unmarried woman in her parent’s home, adults) who learned too much about sex were seen as at risk for participating in deviant premarital relations. Having incomplete information on a subject is worse than having no information at all: while young boys may have understood the mechanics of sex and where to purchase sexual experiences, they didn’t know about the prevalence of STDs, which spread so widely that genital cauterization was seen as a viable way to keep the viruses and infections in check (Porter 134). Misinformation abounded among the under-educated. It was common belief, for example, that STDs could be passed through towels, water fountains and common eating utensils, meaning that philandering husbands didn’t have to explain where they picked up the clap (Melody 23). Sinful sex, mainly sex out of wedlock, was thought to be “procreatively unproductive,” which is obviously wildly untrue (Porter 15). The misinformation didn’t stop at rumor though: sex manuals of the time also propagated incorrect ideas as fact. One writer, Henry Hanchett, who will be discussed in detail later, wrote that “vicarious menstruation” was possible, where the egg was expelled through the nose, lungs or some other place (Melody 25). It was commonly written that women only submitted to their husbands’ sexual desires because they wanted to be mothers, not because they had any sexual desires themselves (Porter 142). This spread of misinformation lead to a lot of confused people, some with damaged health. Not all sex manuals were so misinformed, but most depicted sexuality in a less-than-honest way.
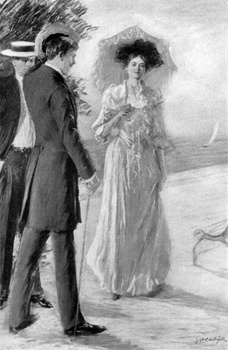
"How Do You Do?" Isaac Henry Calgia, via Wikimedia Commons
Early sex manuals, like "Aristotle's Masterpiece"
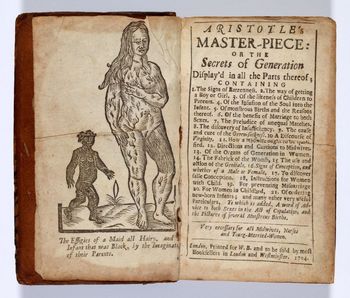
The earliest sex manual that would have been available to Victorian audiences is the anonymously published Aristotle’s Masterpiece, or Directory for Midwives. This 1684 manual was not by Aristotle and was not a masterpiece. In fact, it was just a compilation of various uncredited sources (Porter 33–6). The name Aristotle was chosen to lend an air of expertise and wisdom, which may have worked, since this manual circulated for over 100 years after its initial publication (43, 47, 37). The third edition is the one most likely to have been read by Victorian audiences. It was bawdy and irreverent, giving advice like “but if she is ugly, the advice is: do it in the dark” (qtd. in Porter 38), which probably accounts for teen boys passing this book around like a Playboy. It’s important to recognize that teen boys are the only children that my research cited as reading the manual.
Content of the manual: “Aristotle” agreed with the notion that female sexual pleasure is solely derived from the idea that a child may be conceived, but he takes this idea a step further: women may have even greater sexual satisfaction and pleasure than men because of their desire for motherhood (Melody 46). Aristotle also recognizes the clitoris as an analogous structure to the penis as far as pleasure is concerned (46). The authors of Masterpiece acknowledged that a missing hymen does not necessarily indicate missing virginity (Fisnell 63), a fact that would save many innocent girls from the wrath of the men in their life. This manual focuses, as many did, solely on reproductive, heterosexual intercourse (Porter 42). Unlike Victorian custom though, this manual encouraged marriage soon after puberty to make sure women took advantage of their full span of reproductive years (43). Aristotle said that finding the correct balance of sexual frequency was crucial: “They that would be commended for their Wedlock Actions, and be happy in the fruit of their Labor, must observe to copulate at distance of time, not too often, nor yet too seldom, for both these hurt Fruitfulness alike” (qtd. in Porter 44). Overall, Aristotle’s ideas were socially advanced: while he discouraged sex out of wedlock, he understood female pleasure more than most.
Another example: Tableau de l’amour by Nicolas Venette. This manual was published through the late eighteenth century. Venette explained to women how to fake virginity on their wedding night: abstain for a while, apply constricting ointment and insert a clot of dried blood into the vagina (Porter 81).
Manuals of the nineteenth century: Confused and liberal advice
Library of Congress
While Aristotle’s Masterpiece was cheap and widely produced, the new manuals of the nineteenth century were more available to middle-class consumers since they were a little more expensive (Melody 45). These manuals were numerous and widely published, but were still considered taboo. Any manual that detailed any more than a scientific explanation of reproductive anatomy was considered filth, akin in pornography. The manuals discussed on this page are a fair example of the types of manuals available at the time.
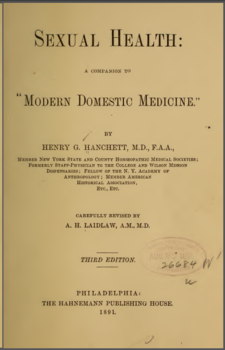
Sexual Health: A Plain and Practical Guide for the People on All Matters Concerning the Organs of Reproduction in Both Sexes and All Ages by Henry Hanchett:
This manual, first published in 1887, toed the line between liberated and conservative advice. Hanchett opens the manual by refusing to apologize for dealing with delicate subjects: “[Hanchett] is fully convinced that much of our disease, as well as of the vice in which it originates, is due to the prevailing ignorance on sexual manners” (Hanchett 4). This idea, that ignorance leads to disease, is considered to be true even today. Hanchett’s idea of vice, however, is different than ideas today. He disapproved of prostitution, which is absolutely still labeled as vice, but he also lumped masturbation in this category. It was common belief at the time that masturbation caused mental defect, and Hanchett was not an exception to these beliefs. Much of the manual is devoted to methods of diverting children from masturbation. Parents were encouraged to run their children around throughout the day in wild play so the children would be too tired to masturbate before bed (Hanchett 16). Sperm should only be used for procreation purposes: it is too precious of a substance to waste in self-abuse (16). Female children were discouraged from masturbation as well, but in a much less drawn-out matter. Women were considered by Hanchett to have a low, almost nonexistent sex drive, so only truly deranged females would succumb to the temptations of masturbation (36).
After dealing with the most important issue of vice, Hanchett delves into actual sexual and reproductive health. He encourages parents to have a similar attitude to his own: educating children will prevent them from coming to harm by making uneducated decisions. Girls, for example, should understand menstruation long before their first period, otherwise they may harm themselves trying to stem the flow of blood in a panic (38). The medical advice he dispenses was not perfect; as discussed on a previous page, he believed in vicarious menstruation. I’m sure many girls were confused and panicked based on this advice (did a nose bleed mean they were menstruating?!). Hanchett wanted women to understand their bodies. He discouraged female prudery, saying “it is no shame to have organs which can house and nurture a budding human life; it is no shame to study those organs and learn how they can best serve the new being that will be dependent upon them and their healthy condition” (qtd. in Michie 25). That being said, he also discourages women from taking advantage of their sexuality, noting that flirtatious women cause men to visit brothels for “relief,” which only adds to the spread of disease (Melody 21).
Once couples were married, however, flirtation was encouraged. According to Hanchett, married couples should have sex every three or so days. If they waited longer for sex, the children propagated from these unions would grow to be shriveled and unhealthy since their parents didn’t express enough love (Melody 26, Michie 23). While he was encouraging married couples to have frequent sex, he was also very opposed to any method of birth control or “avoidance of offspring” (25). To those who did not desire children, he said “there is but one sure, safe, and proper plan for the healthy, and that is to remain single, or, being married, to live as if single” (Hanchett 70). Hanchett said to use a birth control method was against nature, but, the next manual discussed encouraged this sort of family planning.
Every Woman’s Book by Richard Carlile:
When Richard Carlile wrote Every Woman’s Book in 1826, his manual was seen as “irresponsible and obscene” and as a “radical alternative” to Aristotle’s Masterpiece (Bush vii, 1). First of all, this manual was clearly written with females as the primary audience. Sex manuals before had been written for men, with the expectation that husbands would educate their wives, who may, in turn, educate their daughters. This audience selection alone made Carlile radical. A later edition of this manual included the claim that “every healthy woman feels the passion of love” (109), which was very different from the notion that women only put up with sex because of the prospect of motherhood. Carlile was also one of the first sex writers to label sexuality as a virtue, not a vice. He saw love as a desire for sexual gratification (which was perhaps an over-simplification of a complex emotion), and believed that the Christian Church encouraged prostitution and masturbation by discouraging sexual intercourse (11–12).
Perhaps the most radical claim his manual made was for the distribution of inexpensive, reliable birth control methods. He said that contraception would allow freer connection between men and women and would allow women to be sexually experienced and more likely to be happy in their eventual marriages (12). In the text of his essay “What is Love?” (a section in Every Woman’s Book, he said “What a dreadful thing that… love cannot be enjoyed, without conception, when that conception is not desired, when it is a positive injury to the parties themselves and to society at large” (91). A few pages after this, he gives explicit instruction concerning how to use a prophylactic sponge, saying that neither party can feel the sponge and “pleasure is increased in the removal of all dread of evil consequences” (99). Carlile was way ahead of societal propriety. It was not until the 1870s that birth control (condoms, sponges and spermicides) became more widely used and less taboo. The upper-middle class were the first frequent users (Phegley 166).
biography.com
20th Century Knowledge: Victorian after effects
http://anneheywood.hubpages.com/hub/Marie-Stopes
Manuals of the early twentieth century were a little more mindful towards the happiness and sexual health of females. Misinformation was still prevalent: it was commonly noted in these manuals that anything less than simultaneous orgasm during intercourse was “not agreeable.” Women were given the “right” to refuse sex if their husband could not achieve “the orgasm of the woman and the ejaculation of semen of the man in the same instant” (Porter 204). This circumstance is obviously difficult to achieve for even experienced partners, so this expectation surely set some relationships up for failure from the beginning. Isabel Hutton called this act of simultaneous orgasm “mutual adjustment” in her 1923 manual The Hygiene of Marriage (211–14). While manuals were encouraging this perhaps impossible-to-achieve goal to inexperienced partners, they also admitted that first sexual couplings between married people may be awkward, but practice should allow them to learn each other’s bodies (214). Hooray for progress!
Married Love by Marie Stopes was perhaps the most honest and controversial manual of the day. Published in several editions and volumes in the early 1900s, the manual encouraged mutual sexual satisfaction. She was also a huge proponent of birth control and sexual experimentation. Stopes was discredited as a wanton woman, but her honesty gained many fans. Soldiers were known to gift this manual to their fiancees, so the uneducated women would be prepared once their husband-to-be returned from war (Porter 249, 253). Stopes said that the men who visited prostitutes and their frigid wives were the product of their society, which made sexual knowledge and experience taboo (Michie 112). Since men were likely to have been with a prostitute prior to their wedding night, they would find their wife’s inexperience off-putting (113). She acknowledged that the inexperience was so extensive that women may actually be shocked by their new husband’s physical expectations and refuse to participate (113).
While the women to which Stopes is referring were not even born in the Victorian period, they were absolutely affected by the sexual education practices of the time. Since their mothers were uneducated, these modern women did not have any way to learn about sex. It was very much a chain reaction. Parents felt their daughters should learn about sex the way they did: on the wedding night (Porter 251). Even mothers who wanted to explain sex to their daughters were so uneducated and shy that proper explanation was impossible (251). One letter from the time documents a mother telling her daughter on the eve of the daughter’s wedding “[there are] certain things your husband will require from you. It’s not nice and you’ll just have to put up with it” (254), which is petrifying advice to hear when you are about to be alone with a man for the first time. Modern women’s young married friends were even often too ashamed to tell unmarried women of what would be expected by husbands (253).
In conclusion...
Works Cited
- Aristotle, pseudonym. Aristotle’s Masterpiece. London: B.H.: 1698. Early English Books Online. Web. 22 April 2013.
- Bush, Michael. “The Rise of the Sex Manual.” History Today 49.2 (Feb. 1999): 36-43. Points of View Reference Center by EBSCOHOST. Web. 18 April 2013.
- Carlile, Richard. What is love? : Richard Carlile’s philosophy of sex. Ed. Michael Bush. London: Verso, 1998. Print.
- Hanchett, Henry G. Sexual health. A companion to “Modern domestic medicine.” A plain and practical guide for the people in all matters concerning the organs of reproduction in both sexes and all ages. Philadelphia: Hahnemann, 1891. Print.
- Michie, Helena. Victorian Honeymoons: Journeys to the Conjugal. New York: Cambridge UP, 2006. Print.
- Phegley, Jennifer. Courtship and Marriage in Victorian England. Santa Barbara: Praeger, 2012. Print.
- Porter, Roy and Lesley Hall. The facts of life : the creation of sexual knowledge in Britain, 1650-1950. New Haven: Yale UP, 1995. Print.
- Melody, M.E. and Linda M. Peterson. “The Late Victorians and the Spermatic Political Economy.” Teaching America About Sex. New York: New York UP, 1999. 20-48. Print.